昨日に引き続き、CocoaPods で発生したエラーについてです。
今回は、管理しているライブラリのインストール時に発生したエラーの対処法をまとめました。
実際のエラーメッセージは下記の通りです。
[!] Unable to determine Swift version for the following pods:– `MaterialKit` does not specify a Swift version and none of the targets (`[プロジェクト名]`) integrating it have the `SWIFT_VERSION` attribute set. Please contact the author or set the `SWIFT_VERSION` attribute in at least one of the targets that integrate this pod.
– `PullToRefreshSwift` does not specify a Swift version and none of the targets (`[プロジェクト名]`) integrating it have the `SWIFT_VERSION` attribute set. Please contact the author or set the `SWIFT_VERSION` attribute in at least one of the targets that integrate this pod.
– `RealmSwift` does not specify a Swift version and none of the targets (`[プロジェクト名]`) integrating it have the `SWIFT_VERSION` attribute set. Please contact the author or set the `SWIFT_VERSION` attribute in at least one of the targets that integrate this pod.
翻訳したところ、「次のポッドの Swift バージョンを判別できません」とのことでした。
で、対処方法ですが、まず前提として私の環境は一旦 Pods ディレクトリと [プロジェクト名].xcworkspace を削除して、ライブラリを一からインストールし直している状態でした。
この状況で上記のエラーなので、[プロジェクト名].xcworkspace すら作成されないという…。
なので、一旦 Podfile を開き、インストールに問題があったライブラリをコメントアウトします。
私の環境では、MaterialKit と PullToRefreshSwift と RealmSwift の3つのライブラリをコメントアウトしました。
なお、Podfile でのコメントアウトをする場合は、文頭に半角シャープ # をつけてください。
上記の作業後、再度 pod install コマンドを実行してください。
そうすると、無事に [プロジェクト名].xcworkspace ファイルが作成されると思いますので、これを Xcode で開きます。
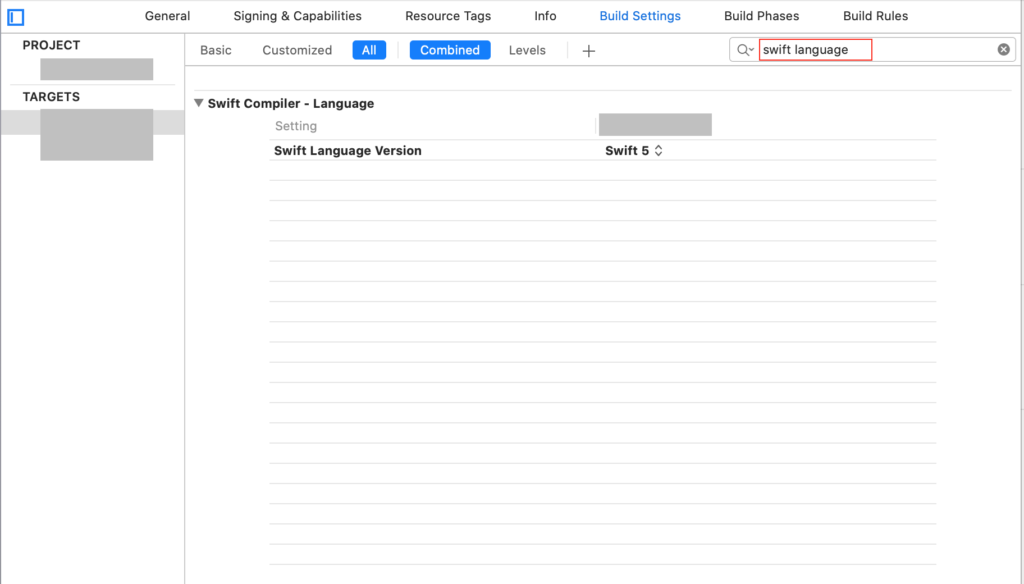
そうしたら、Build Settings で「swift language」と検索します。
すると、下のスクリーンショットのように、「Swift Language Version」という項目がヒットするはずですので、こちらの値を設定してください。

私の環境ではこの項目の設定値が「Unspecified」で未特定になっていたため、CocoaPods でのライブラリインストール時にエラーが発生していたようでした。
なお、念のため TARGETS の設定値だけでなく、PROJECT でも Swift Language Version の値を指定してください。
あとは、一旦 Xcode を閉じて、再度 iTerms などのターミナルアプリで pod install を実行してください。
ライブラリ自体に問題がなければ、この方法でインストールが完了するはずです。
以上、pod install コマンド実行時にエラーが発生する時の対処法でした。
ご参考になれば幸いです。


