

よく次の様なガントチャート的なデザインがあります、
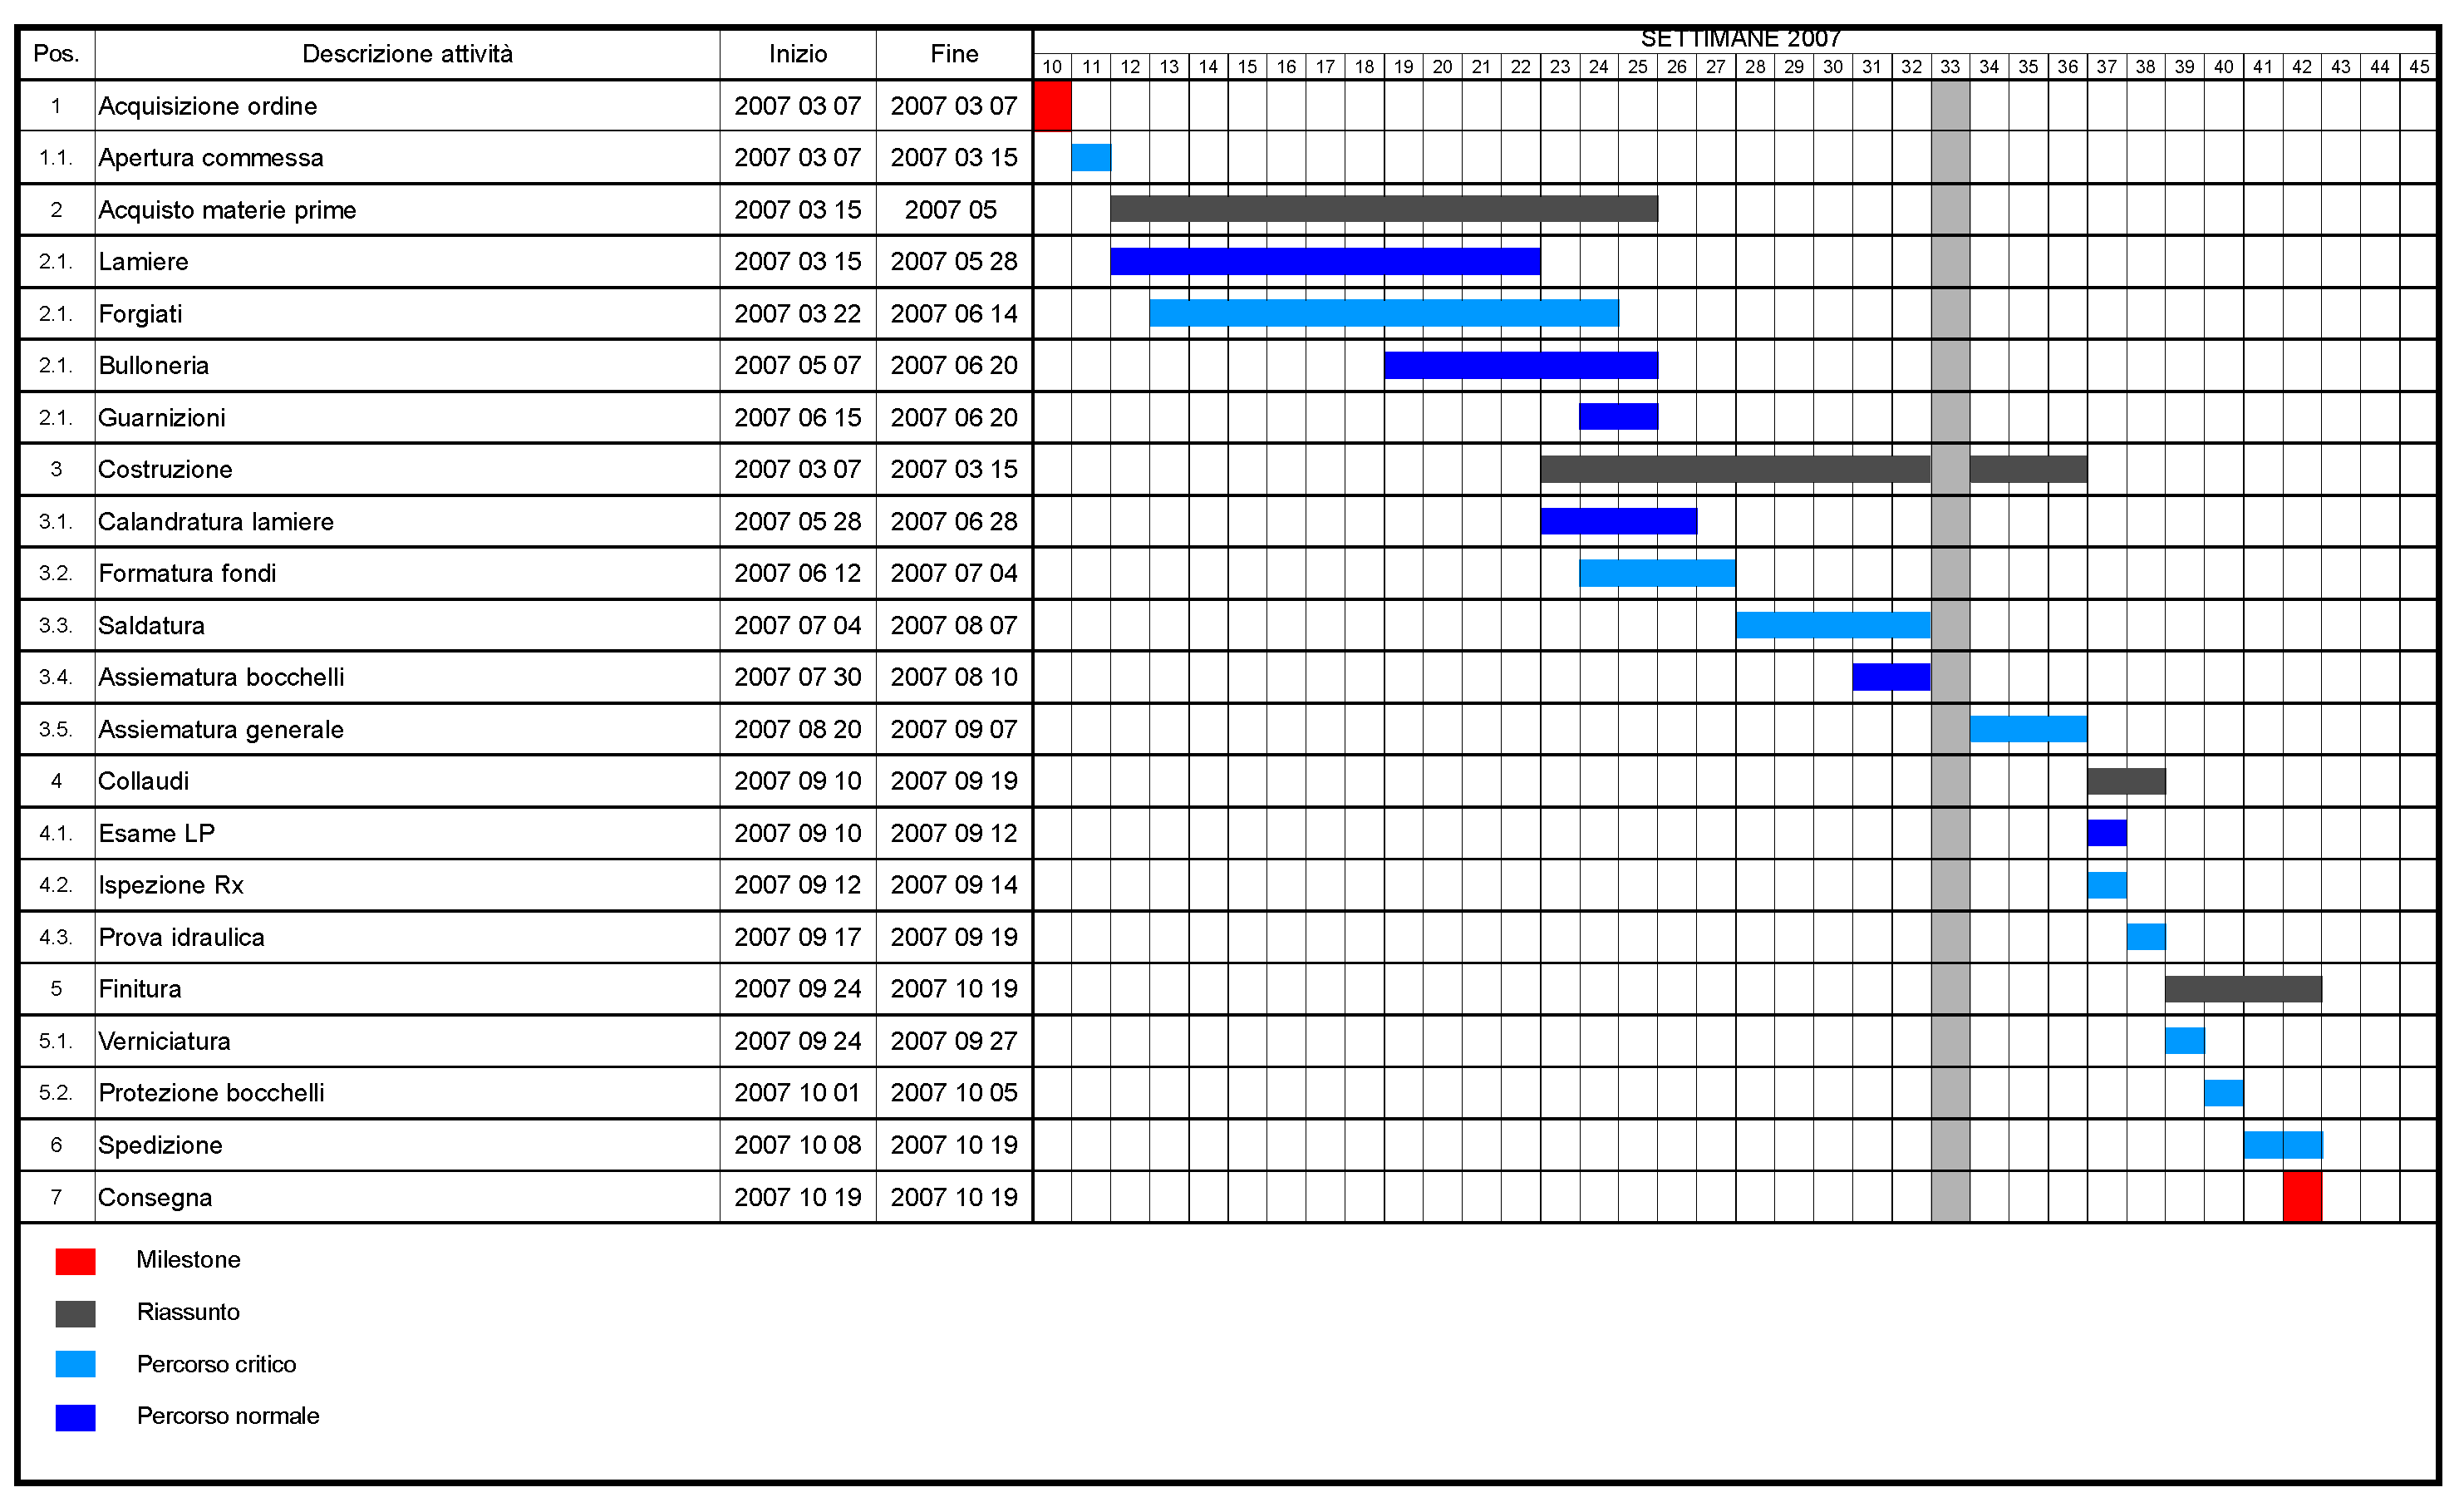
これは一行一データで日時範囲をグラフに描画していくグラフです。ガントチャートとしてリッチなものはある作業と前提となる作業の関係など様々なものを描画しますが、一つ一つの要素にグラフ上で情報があまりない時もあります。そういった時は一画面に複数の日時範囲と必要なな情報だけ見える方がうれしいです。例の画像では20行程のグラフになっていますが、もし詰めた場合、10行もいらなくなるでしょう。この詰めた場合を描画するデモが次です。
クリックしてソースコードを展開
# フォルダ構造
.
│  App.tsx
│  styles.scss
│  useTimeline.ts
│
├─components
│      Cell.tsx
│      Row.tsx
│
└─models
        CellContract.tsx
App.tsx
import React from "react";
import "./styles.scss";
import { useTimeline } from "./useTimeline";
import { Row } from "./components/Row";

// テストデータの生成。
// 0~200 までのランダムな範囲を取る20個の値を生成する
const testDataLen = 20;
const testData = Array(testDataLen)
  .fill(null)
  .map((_, i) => {
    const start = Math.floor(Math.random() * 150);
    const end = start + 30 + Math.floor(Math.random() * 50);
    const backgroundColor = `hsl(${(360 / testDataLen) * i},100%,75%)`;
    return {
      start,
      end,
      backgroundColor,
      text: `${i}番: ${start} ~ ${end}`
    };
  });

export default function App() {
  // 見栄えが良くなるようにテストデータを複数行に振り分けるフックを使用
  const { rows } = useTimeline(testData);

  return (
    <div className="App">
      {/* 振り分けられた行ごとに描画 */}
      {rows.map((cellList, index) => (
        <Row key={index} cellList={cellList} />
      ))}
    </div>
  );
}
styles.scss
.App {
  .row {
    position: relative;
    height: 2em;
    .cell{
      position: absolute;
      height: 100%;
    }
  }
}
useTimeline.ts
import { useState } from "react";
import { CellContract } from "./models/CellContract";

// 最低限の範囲指定の型定義
type RangeContract = {
  start: number;
  end: number;
};
// useTimelineの返り値型
type UseTimelineRet<T extends RangeContract> = {
  rows: CellContract[][];
  setData: (newData: T[]) => void;
  appendData: (newData: T) => void;
};
/** 範囲指定された要素を複数行に振り分けて返す */
export const useTimeline = <T extends RangeContract>(
  initData: T[]
): UseTimelineRet<T> => {
  // 処理するデータを状態として定義
  const [data, setData] = useState<T[]>(initData);
  // 割合で幅を指定するためにデータの中の最小値、最大値を求める
  // 表示内容の端をデータに関わらず決定する場合はここで計算するのではなく、なにかしら決め打ちをする
  const start = Math.min(...data.map((d) => d.start));
  const end = Math.max(...data.map((d) => d.end));

  /** backgroundColor がデータに含まれていない際に用いるデフォルト色生成用に用意 */
  let indexForColor = 0;
  // データ複数行へ割りあてる
  const rows = allocateRagesToRows<T>([...data])
    // 行ごとに振り分けられたデータを画面に表示するために必要な情報を埋める。
    .map((rangeList) =>
      rangeList.map(
        (range): CellContract => {
          return {
            // 表示用のデフォルト値を定義。hslを使うといい感じに色相環をぐるっと回れて便利
            backgroundColor: `hsl(${
              (360 / data.length) * indexForColor++
            },100%,50%)`,
            text: "",
            // 元々のオブジェクトを↑より後に展開することによって backgroundColor, text を元々持っていた場合、そちらを優先して使う様にする
            ...range,
            // 計算結果の範囲を定義
            startPer: (range.start - 0.5) / (end - start),
            endPer: (range.end + 0.5) / (end - start)
          };
        }
      )
    );

  // 結果を返す
  return {
    rows,
    setData,
    appendData: (newData) => setData([...data, newData])
  };
};

/** 範囲を持つデータを範囲が被らない様に複数行に振り分ける */
function allocateRagesToRows<T extends RangeContract>(rangeList: T[]): T[][] {
  // 割り当てスロット。この 1 スロットが 1 行になる
  // Array(ranges.length).fill([]) とすると全ての配列が fill に渡した配列を参照し、同期してしまうので注意
  // あらかじめ十分なスロット数を確保する。rangeList.length の大きさ分確保する理由は、全ての範囲が重なった場合が最も多くのスロットが必要な場合のため。
  const slots: T[][] = Array(rangeList.length)
    .fill(null)
    .map(() => []);
  rangeList
    // 始点昇順でソート
    .sort((a, b) => spaceshipEval(a.start, b.start))
    .forEach((range) => {
      // スロットをループ。ループ中断のために for 文を使用
      // 空のある番号の若いスロットを見つけ次第、範囲オブジェクトを追加する
      // 範囲オブジェクトを追加した場合、そのループに用はなくなるので処理時間短縮のためにループを打ち切る
      for (const currentSlot of slots) {
        // 空のスロットを見つけたら範囲オブジェクトを追加
        if (currentSlot.length === 0) {
          currentSlot.push(range);
          return;
        }
        // スロットの末尾範囲オブジェクトの終点が追加したい範囲オブジェクトの始点より前にある場合、範囲オブジェクトを追加
        if (currentSlot[currentSlot.length - 1].end < range.start) {
          currentSlot.push(range);
          return;
        }
      }
    });
  // 使用しなかった空スロットを捨てる
  return slots.filter((s) => s.length > 0);
}

/** PHP の宇宙船演算子。ソートメソッドで使うと便利 */
function spaceshipEval(a: number | string, b: number | string): -1 | 0 | 1 {
  if (a < b) {
    return -1;
  }
  if (a > b) {
    return 1;
  }
  return 0;
}
Cell.tsx
import React from "react";
import { CellContract } from "../models/CellContract";

type CellProps = CellContract;
/**
 * ある範囲指定の色付き箱を用意します。
 */
export const Cell: React.FC<CellProps> = ({
  backgroundColor,
  startPer,
  endPer,
  text
}) => {
  return (
    <div
      className={"cell"}
      style={{
        backgroundColor,
        left: `${startPer * 100}%`,
        width: `${(endPer - startPer) * 100}%`
      }}
    >
      {text}
    </div>
  );
};
Row.tsx
import React from "react";
import { Cell } from "./Cell";
import { CellContract } from "../models/CellContract";

type RowProps = {
  cellList: CellContract[];
};
export const Row: React.FC<RowProps> = ({ cellList }) => {
  // 行の中のセルを描画
  return (
    <div className={"row"}>
      {cellList.map((cell) => (
        <Cell key={`${cell.startPer}-${cell.endPer}`} {...cell} />
      ))}
    </div>
  );
};
CellContract.tsx
import { CSSProperties } from "react";
// 行の中に表示されるデータに必要な情報。
export type CellContract = {
  backgroundColor: CSSProperties["backgroundColor"];
  startPer: number;
  endPer: number;
  text: string;
};
import React from "react";
import "./styles.scss";
import { useTimeline } from "./useTimeline";
import { Row } from "./components/Row";
// テストデータの生成。
// 0~200 までのランダムな範囲を取る20個の値を生成する
const testDataLen = 20;
const testData = Array(testDataLen)
.fill(null)
.map((_, i) => {
const start = Math.floor(Math.random() * 150);
const end = start + 30 + Math.floor(Math.random() * 50);
const backgroundColor = `hsl(${(360 / testDataLen) * i},100%,75%)`;
return {
start,
end,
backgroundColor,
text: `${i}番: ${start} ~ ${end}`
};
});
export default function App() {
// 見栄えが良くなるようにテストデータを複数行に振り分けるフックを使用
const { rows } = useTimeline(testData);
return (
<div className="App">
{/* 振り分けられた行ごとに描画 */}
{rows.map((cellList, index) => (
<Row key={index} cellList={cellList} />
))}
</div>
);
}
styles.scss
.App {
.row {
position: relative;
height: 2em;
.cell{
position: absolute;
height: 100%;
}
}
}
useTimeline.ts
import { useState } from "react";
import { CellContract } from "./models/CellContract";
// 最低限の範囲指定の型定義
type RangeContract = {
start: number;
end: number;
};
// useTimelineの返り値型
type UseTimelineRet<T extends RangeContract> = {
rows: CellContract[][];
setData: (newData: T[]) => void;
appendData: (newData: T) => void;
};
/** 範囲指定された要素を複数行に振り分けて返す */
export const useTimeline = <T extends RangeContract>(
initData: T[]
): UseTimelineRet<T> => {
// 処理するデータを状態として定義
const [data, setData] = useState<T[]>(initData);
// 割合で幅を指定するためにデータの中の最小値、最大値を求める
// 表示内容の端をデータに関わらず決定する場合はここで計算するのではなく、なにかしら決め打ちをする
const start = Math.min(...data.map((d) => d.start));
const end = Math.max(...data.map((d) => d.end));
/** backgroundColor がデータに含まれていない際に用いるデフォルト色生成用に用意 */
let indexForColor = 0;
// データ複数行へ割りあてる
const rows = allocateRagesToRows<T>([...data])
// 行ごとに振り分けられたデータを画面に表示するために必要な情報を埋める。
.map((rangeList) =>
rangeList.map(
(range): CellContract => {
return {
// 表示用のデフォルト値を定義。hslを使うといい感じに色相環をぐるっと回れて便利
backgroundColor: `hsl(${
(360 / data.length) * indexForColor++
},100%,50%)`,
text: "",
// 元々のオブジェクトを↑より後に展開することによって backgroundColor, text を元々持っていた場合、そちらを優先して使う様にする
...range,
// 計算結果の範囲を定義
startPer: (range.start - 0.5) / (end - start),
endPer: (range.end + 0.5) / (end - start)
};
}
)
);
// 結果を返す
return {
rows,
setData,
appendData: (newData) => setData([...data, newData])
};
};
/** 範囲を持つデータを範囲が被らない様に複数行に振り分ける */
function allocateRagesToRows<T extends RangeContract>(rangeList: T[]): T[][] {
// 割り当てスロット。この 1 スロットが 1 行になる
// Array(ranges.length).fill([]) とすると全ての配列が fill に渡した配列を参照し、同期してしまうので注意
// あらかじめ十分なスロット数を確保する。rangeList.length の大きさ分確保する理由は、全ての範囲が重なった場合が最も多くのスロットが必要な場合のため。
const slots: T[][] = Array(rangeList.length)
.fill(null)
.map(() => []);
rangeList
// 始点昇順でソート
.sort((a, b) => spaceshipEval(a.start, b.start))
.forEach((range) => {
// スロットをループ。ループ中断のために for 文を使用
// 空のある番号の若いスロットを見つけ次第、範囲オブジェクトを追加する
// 範囲オブジェクトを追加した場合、そのループに用はなくなるので処理時間短縮のためにループを打ち切る
for (const currentSlot of slots) {
// 空のスロットを見つけたら範囲オブジェクトを追加
if (currentSlot.length === 0) {
currentSlot.push(range);
return;
}
// スロットの末尾範囲オブジェクトの終点が追加したい範囲オブジェクトの始点より前にある場合、範囲オブジェクトを追加
if (currentSlot[currentSlot.length - 1].end < range.start) {
currentSlot.push(range);
return;
}
}
});
// 使用しなかった空スロットを捨てる
return slots.filter((s) => s.length > 0);
}
/** PHP の宇宙船演算子。ソートメソッドで使うと便利 */
function spaceshipEval(a: number | string, b: number | string): -1 | 0 | 1 {
if (a < b) {
return -1;
}
if (a > b) {
return 1;
}
return 0;
}
Cell.tsx
import React from "react";
import { CellContract } from "../models/CellContract";
type CellProps = CellContract;
/**
* ある範囲指定の色付き箱を用意します。
*/
export const Cell: React.FC<CellProps> = ({
backgroundColor,
startPer,
endPer,
text
}) => {
return (
<div
className={"cell"}
style={{
backgroundColor,
left: `${startPer * 100}%`,
width: `${(endPer - startPer) * 100}%`
}}
>
{text}
</div>
);
};
Row.tsx
import React from "react";
import { Cell } from "./Cell";
import { CellContract } from "../models/CellContract";
type RowProps = {
cellList: CellContract[];
};
export const Row: React.FC<RowProps> = ({ cellList }) => {
// 行の中のセルを描画
return (
<div className={"row"}>
{cellList.map((cell) => (
<Cell key={`${cell.startPer}-${cell.endPer}`} {...cell} />
))}
</div>
);
};
CellContract.tsx
import { CSSProperties } from "react";
// 行の中に表示されるデータに必要な情報。
export type CellContract = {
backgroundColor: CSSProperties["backgroundColor"];
startPer: number;
endPer: number;
text: string;
};
import React from "react";
import { CellContract } from "../models/CellContract";
type CellProps = CellContract;
/**
* ある範囲指定の色付き箱を用意します。
*/
export const Cell: React.FC<CellProps> = ({
backgroundColor,
startPer,
endPer,
text
}) => {
return (
<div
className={"cell"}
style={{
backgroundColor,
left: `${startPer * 100}%`,
width: `${(endPer - startPer) * 100}%`
}}
>
{text}
</div>
);
};
Row.tsx
import React from "react";
import { Cell } from "./Cell";
import { CellContract } from "../models/CellContract";
type RowProps = {
cellList: CellContract[];
};
export const Row: React.FC<RowProps> = ({ cellList }) => {
// 行の中のセルを描画
return (
<div className={"row"}>
{cellList.map((cell) => (
<Cell key={`${cell.startPer}-${cell.endPer}`} {...cell} />
))}
</div>
);
};
CellContract.tsx
import { CSSProperties } from "react";
// 行の中に表示されるデータに必要な情報。
export type CellContract = {
backgroundColor: CSSProperties["backgroundColor"];
startPer: number;
endPer: number;
text: string;
};
import React from "react";
import { Cell } from "./Cell";
import { CellContract } from "../models/CellContract";
type RowProps = {
cellList: CellContract[];
};
export const Row: React.FC<RowProps> = ({ cellList }) => {
// 行の中のセルを描画
return (
<div className={"row"}>
{cellList.map((cell) => (
<Cell key={`${cell.startPer}-${cell.endPer}`} {...cell} />
))}
</div>
);
};
CellContract.tsx
import { CSSProperties } from "react";
// 行の中に表示されるデータに必要な情報。
export type CellContract = {
backgroundColor: CSSProperties["backgroundColor"];
startPer: number;
endPer: number;
text: string;
};
import { CSSProperties } from "react";
// 行の中に表示されるデータに必要な情報。
export type CellContract = {
backgroundColor: CSSProperties["backgroundColor"];
startPer: number;
endPer: number;
text: string;
};
これを実現するアルゴリズムの方針は行の空いている部分に要素をとにかく入れる、というのみです。これを大雑把な疑似コードにすると次になります。
行リスト = [[], [], ...] // 必要な行を用意。行は範囲持ち要素を複数持つ
foreach( 範囲持ち要素群 as 現在参照要素)
{
    foreach( 行リスト as 行 )
    {
        if(現在参照要素が他要素を邪魔せず行に収まる)
        {
            行に要素を追加
            continue;
        }
    }
}
この肝の部分を実装しているのがソースコード中の useTimeline.ts です。
こういった複数スロットに要素を割り当てる方法は自前でアルゴリズムが必要なデザインを考える時、何かと応用が効きます。