以前からディープランニング型AIを実現するためのライブラリとして、TensorFlowというものがよく使われています。
ご存知の方も多いかと思います。
自分は今まであまり触れてこなかったのですが、知人がTensorFlowを使って簡易的な画像認識アプリを構築しているのをみて、自分も触れてみようと思い立ちました。
手元に自由に触れるUbuntuサーバーがあったので、こちらにTensorFlowが動作する環境を構築してみます。
まずはpipをインストールします。
sudo apt update
sudo apt install python-pip python-dev
インストール完了したらつぎにpipでTensorFlow(CPU版)を入手、インストールします。
#CPU版TensorFlowインストール
sudo pip install --upgrade https://storage.googleapis.com/tensorflow/linux/cpu/tensorflow-0.7.1-cp27-none-linux_x86_64.whl
TensorFlowはCPU版とGPU版があり、GPU版を利用するとGPUを使って計算を行ってくれます。
ただし、GPU版はnVidia製GPUのみが対応している”CUDA”が必要になります。
GPU版を入手する場合は下記のコマンドを使用します。
#GPU版TensorFlowインストール
sudo pip install --upgrade https://storage.googleapis.com/tensorflow/linux/gpu/tensorflow-0.7.1-cp27-none-linux_x86_64.whl
nVidia製以外のGPUを搭載していたり、ドライバが適切に設定されていない環境でGPU版を利用すると、エラーが発生して実行できません。
python
Python 2.7.12 (default, Dec  4 2017, 14:50:18)
[GCC 5.4.0 20160609] on linux2
Type "help", "copyright", "credits" or "license" for more information.
>>> import tensorflow as tf
Traceback (most recent call last):
  File "<stdin>", line 1, in <module>
  File "/usr/local/lib/python2.7/dist-packages/tensorflow/__init__.py", line 23, in <module>
    from tensorflow.python import *
  File "/usr/local/lib/python2.7/dist-packages/tensorflow/python/__init__.py", line 49, in <module>
    from tensorflow import contrib
  File "/usr/local/lib/python2.7/dist-packages/tensorflow/contrib/__init__.py", line 23, in <module>
    from tensorflow.contrib import layers
  File "/usr/local/lib/python2.7/dist-packages/tensorflow/contrib/layers/__init__.py", line 68, in <module>
    from tensorflow.contrib.layers.python.layers import *
  File "/usr/local/lib/python2.7/dist-packages/tensorflow/contrib/layers/python/layers/__init__.py", line 22, in <module>
    from tensorflow.contrib.layers.python.layers.initializers import *
  File "/usr/local/lib/python2.7/dist-packages/tensorflow/contrib/layers/python/layers/initializers.py", line 24, in <module>
    from tensorflow.python.ops import random_ops
  File "/usr/local/lib/python2.7/dist-packages/tensorflow/python/ops/random_ops.py", line 23, in <module>
    from tensorflow.python.framework import ops
  File "/usr/local/lib/python2.7/dist-packages/tensorflow/python/framework/ops.py", line 39, in <module>
    from tensorflow.python.framework import versions
  File "/usr/local/lib/python2.7/dist-packages/tensorflow/python/framework/versions.py", line 22, in <module>
    from tensorflow.python import pywrap_tensorflow
  File "/usr/local/lib/python2.7/dist-packages/tensorflow/python/pywrap_tensorflow.py", line 28, in <module>
    _pywrap_tensorflow = swig_import_helper()
  File "/usr/local/lib/python2.7/dist-packages/tensorflow/python/pywrap_tensorflow.py", line 24, in swig_import_helper
    _mod = imp.load_module('_pywrap_tensorflow', fp, pathname, description)
ImportError: libcudart.so.7.5: cannot open shared object file: No such file or directory
インストールが完了したら、Pythonインタープリタに入ります。
python
すると、pythonの実行環境が起動し、
“>>>”
プロンプトが表示されるので、つづけて下記のように順に入力します。
>>> import tensorflow as tf
>>> hello = tf.constant('Hello, TensorFlow!')
>>> sess = tf.Session()
>>> sess.run(hello)
>>> a = tf.constant(10)
>>> b = tf.constant(32)
>>> sess.run(a+b)
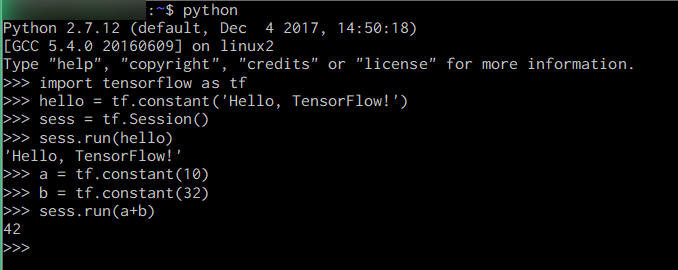
実行結果はこんな感じです。
>>> import tensorflow as tf
>>> hello = tf.constant('Hello, TensorFlow!')
>>> sess = tf.Session()
>>> sess.run(hello)
'Hello, TensorFlow!'
>>> a = tf.constant(10)
>>> b = tf.constant(32)
>>> sess.run(a+b)
42
ここまで動作すれば、TensorFlowは正常に動作しています。
Linux環境だと、大抵は初めからPythonが入っているので、セットアップ手順が少なくて済むのでありがたいのですが、Python自体を使用しているディストリビューションやアプリもあるようで、不用意にPythonのバージョンをアップグレードしてしまうと、OSやアプリが動作しなくなる危険もあるようです。
その場合はPyenvを利用してアプリごとにPythonのバージョンを切り替えることで対応できるようです。
pyenv + anaconda + python3 – Qiita
この辺りもまた試してみたいと思います。
参考サイト:
UbuntuにTensorFlowをインストール – Qiita
Ubuntu 16.04+CUDA 8.0+Tensorflow 環境で起きるlibcudartが見つからない問題を解決する – Qiita


