
React Native のアプリでチャット機能を実装する際に「react-native-gifted-chat」というライブラリを使用しているのですが、今回は、このライブラリを使って返信(リプライ)機能を実装する手順についてです。
今後も使いそうなので、備忘録かつ、コピー&ペースト元としてまとめ。
実装には、下記の記事を参考にさせていただきました。
Reply for Particular Message · Issue #750 · FaridSafi/react-native-gifted-chat · GitHub
https://github.com/FaridSafi/react-native-gifted-chat/issues/750
実装手順は長くなるので…まず、必要な部分のコードはこちら!
最初に必要なライブラリ等をインポートします。
import React from 'react';
import { StyleSheet, Text, View, TouchableOpacity } from 'react-native';
import { GiftedChat } from 'react-native-gifted-chat';
import moment from 'moment';
import UUID from 'uuidjs';
import Ionicons from 'react-native-vector-icons/Ionicons';
次に、追加する関数がこちら。
/**
 * メッセージをロングタップして返信する
 */
this.onLongPress = (context, message) => {
  this.setState({ replyMessage: message });
}
/**
 * メッセージを送信する
 */
this.onSend = (rawData) => {
  const createdAt = moment().format('YYYY-MM-DD HH:mm:ss');
  const message = {
    _id: UUID.generate(),
    text: rawData[0]['text'],
    memberNo: 1,
    createdAt: createdAt,
    reply: this.state.replyMessage,
  };
  /* ここでメッセージの送信処理を実行する */
  this.setState({ replyMessage: null });  // ←メッセージの送信処理が完了したら実行
}
/**
 * 吹き出し内に返信元メッセージを表示する
 */
this.renderCustomView = props => (
  <View>
    { props.currentMessage.reply ?
      <View style={{...styles.replyContainer, ...styles.replyBubbleContainer}}>
        <View style={{...styles.replyBorder, backgroundColor: '#0A2B47'}} />
        <View>
          <Text style={{...styles.replyName, color: '#E0F0FE' }}>{props.currentMessage.reply.user.name}</Text>
          <Text numberOfLines={2} ellipsizeMode="tail" style={{...styles.replyText, color: "#E0F0FE" }}>{props.currentMessage.reply.text}</Text>
        </View>
      </View> : null }
  </View>
)
/**
 * 返信する対象のメッセージをフッターに表示
 */
this.renderFooter = props => (
  <View>
  { this.state.replyMessage ?
      <View style={styles.replyContainer}>
        <View style={styles.replyBorder} />
        <View>
          <Text style={styles.replyName}>{this.state.replyMessage.user.name}</Text>
          <Text numberOfLines={1} ellipsizeMode="tail" style={styles.replyText}>{this.state.replyMessage.text}</Text>
        </View>
        <TouchableOpacity onPress={() => this.setState({ replyMessage: null })} style={styles.replyClose}>
          <Ionicons name='close-outline' color='#999' size={20} />
        </TouchableOpacity>
      </View> : null }
  </View>
)
最後に、render() の return 内に記述する <GiftedChat /> がこちら。
なお、追加するのは最後の 3行、renderCustomView、renderFooter、onLongPress です。
<GiftedChat
  messages={this.state.messages}
  onSend={messages => this.onSend(messages)}
  user={{
    _id: [送信者ID],
    name: [送信者名],
    avatar: [送信者アイコンの画像パス],
  }}
  placeholder='メッセージを入力'
  locale='ja'
  timeFormat='H:mm'
  dateFormat='M月D日'
  keyboardShouldPersistTaps='never'
  renderSend={this.renderSend}
  renderCustomView={this.renderCustomView}
  renderFooter={this.renderFooter}
  onLongPress={this.onLongPress} />
StyleSheet は下記のとおりです。
なお、アプリのメインカラーが青色なので、配色も青系統になっています。
このあたりは、適宜変更してください。
const styles = StyleSheet.create({
  replyContainer: {
    margin: 5,
    backgroundColor: '#E0F0FE',
    minHeight: 50,
    flexDirection: 'row',
    alignItems: 'center',
  },
  replyBorder: {
    backgroundColor: '#2699FB',
    width: 5,
    height: '100%',
  },
  replyName: {
    paddingTop: 5,
    paddingHorizontal: 10,
    fontWeight: 'bold',
    color: '#666',
  },
  replyText: {
    color: '#999',
    paddingHorizontal: 10,
    paddingBottom: 5,
  },
  replyClose: {
    position: 'absolute',
    padding: 5,
    top: 0,
    right: 0,
  },
  replyBubbleContainer: {
    marginTop: 10,
    borderRadius: 5,
    maxWidth: 200,
    backgroundColor: '#15578F',
    overflow: 'hidden',
  },
});
さて、一つずつ説明しますと、まず <GiftedChat /> の onLongPress に、メッセージの吹き出しが長押しされた時の処理を指定します。
これは上記サンプルコードの this.onLongPress で、今回は長押しされたメッセージの情報を state の replyMessage に保存しているだけです。
なお、もしメッセージを長押しした際に実行する処理の候補が複数ある場合は、「react-native-action-sheet」ライブラリで ActionSheet を表示させるなどしてください。
で、state の replyMessage にデータが保存されると、renderFooter で指定されたコンポーネントが描画されます。
サンプルコードでは this.renderFooter で指定されたコンポーネントの内容が描画され、これは state の replyMessage にデータがある場合にのみ描画されます。
実際の画面のスクリーンショットは下記のとおりです。
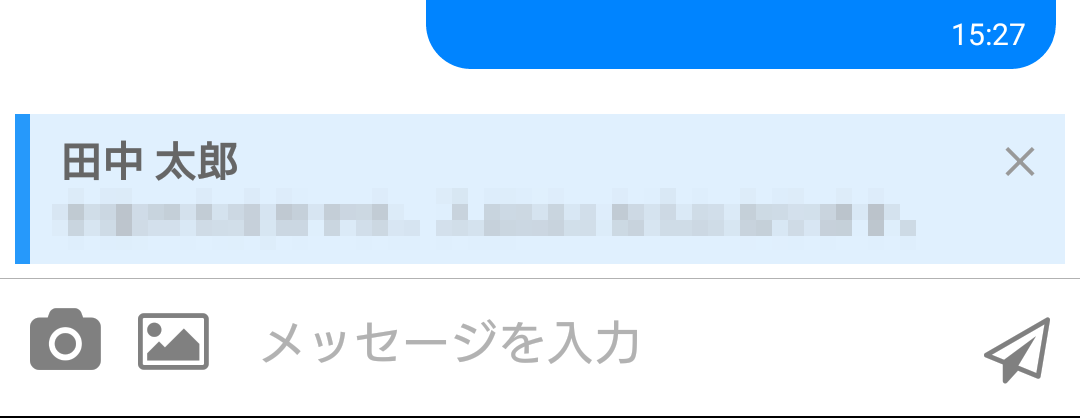
右上の閉じるアイコンボタンがタップされると、state の replyMessage が削除されるので消えます。
何かメッセージを打ち送信すると、onSend で指定した関数が実行されますが、この時、送信データに reply という項目で返信元のメッセージデータも併せて送信するように修正します。
こちらの処理に関しては this.onSend をご参照ください。
最後は reply データが含まれているメッセージデータを表示する処理で、この処理は renderCustomView を使用します。
this.renderCustomView 内で返信元メッセージを描画する処理を実行しています。
実際の画面は下記のとおりです。
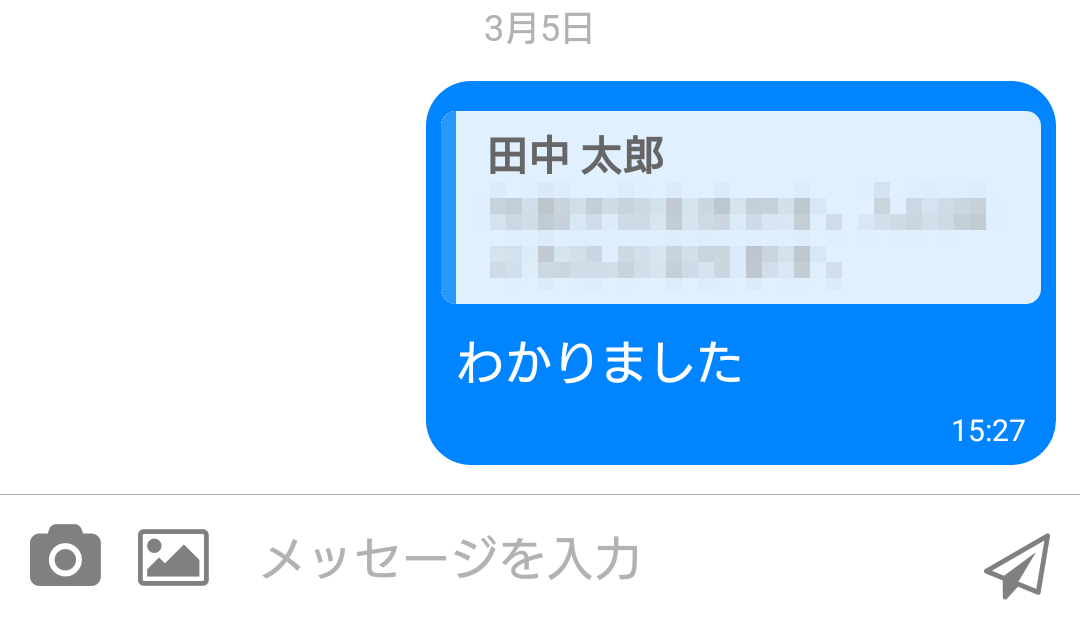
renderCustomView を使うと、自分が入力したメッセージの上に CustomView を描画することができます。
こちらは今回初めて使ったので知りませんでした!
なお、renderCustomView で表示するコンポーネントを、自分が送信したメッセージや画像の下に表示させたい場合は、isCustomViewBottom という Props に true を追加すればOKです。
なお、デフォルトの値は false です。
個人的には、返信元メッセージが自分のメッセージの上に表示されている方がしっくりくるので、今回は指定しませんでした。
実装するコードは以上です。
返信元メッセージをフッターに表示する機能は意外と簡単に実装できたのですが、吹き出し内に返信元メッセージを表示するところで若干苦戦しました…。
最初、renderCustomView を使用することを思いつかなかったので、renderBubble で吹き出しのコンポーネントをカスタマイズすることで対応しようとしてしまいました…。
その後、参考サイトを読み返し、renderCustomView に気がついたので事なきを得ました。
参考サイトがとにかく参考になったので、実装の際は主にこちらを確認しながら作業することをお勧めします。
以上、React Native の「react-native-gifted-chat」ライブラリで返信機能を実装する方法についてでした。
ご参考になれば幸いです。